Launching Matillion ETL from Azure Marketplace
- DarkLight
Launching Matillion ETL from Azure Marketplace
- DarkLight
Article Summary
Share feedback
Thanks for sharing your feedback!
Warning
New customers must go through the Matillion Hub to select their preferred cloud provider and data warehouse to begin their Matillion ETL journey.
Overview
This article describes how to launch and connect to Matillion ETL from the Azure Marketplace.
Matillion ETL provides users with data loading and transformation solutions built for the cloud, for Snowflake, Azure Synapse Analytics, and Delta Lake on Databricks. Matillion ETL takes full advantage of the cloud to process data, and make it useful.
Note
- This document is specifically for users launching their Matillion ETL instances through the Matillion Hub.
- Once you've registered with the Matillion Hub, ensure you subscribe to a payment plan. For example, Pay-Go. For more information, read Manage Subscription.
Prerequisites
Before launching a Matillion ETL instance you will need to register for a Matillion Hub account. You will also require:
- Adequate knowledge about the cloud service account (AWS, Azure, GCP) and Cloud Data Warehouse (Snowflake, Redshift or Google BigQuery) you want to launch.
- A user with admin permissions who can access the intended cloud service account.
- Access to a cloud storage bucket (S3, Azure, Blob Storage or Google Cloud Storage) to house the transient staging files Matillion used to load data to the cloud.
- A network path to access the intended data sources. This may involve working with your network team to enable access to on-premise databases.
Launching Matillion ETL from the Azure Marketplace
Use the following steps to launch and configure Matillion ETL:
- Access Azure Marketplace. Type "Matillion" in to the search bar at the top of the page, and click the Matillion ETL listing.

Note
If you are not already logged into Azure Marketplace, you will be prompted for your Azure account credentials.
- The Create this App in Azure dialog will launch. Provide the required profile information, and click Continue. Azure will store your Microsoft Account data to help you get started. To ensure the log in process is easier next time, your details will be saved.

If you have already provided basic profile information, a pop-up dialog will be displayed. Tick the checkbox to give Microsoft permission to use or share your account information, and click Continue. You will be redirected to the Matillion ETL page in Azure to complete the configuration process.
The Matillion ETL page will display tabs offering detailed information about the product, such as an Overview, Plans, Usage Information and support, Ratings and Reviews. Click Create next to the Plan drop-down menu to continue the process on the next page.
In order to create a Matillion ETL virtual machine, you need to provide project details to customize your new Matillion ETL instance. This will include Subscription and Instance details, situated on the Create Matillion ETL page, in the Basics tab:
Subscription: Select the desired subscription from the drop-down menu. This field is likely to default to your preferred subscription. Please note, all resources in an Azure subscription will be billed together.
Resource Group: Assign a resource group to the selected subscription, or create a new one for your Matillion ETL instance. A resource group is a collection of resources that share the same permissions and policies.
Region: Choose the desired Azure region that is right for you and your customers. Not every resource is available in every region.
Matillion Product: Select the desired Matillion product to launch:
- Matillion ETL for Snowflake
- Matillion ETL for Azure Synapse
- Matillion ETL for Delta Lake on Databricks
Virtual Machine Name: Provide the name for the virtual machine.
Username: The administrator username for the Azure virtual machine.
Password: The administrator password for the Azure virtual machine.
SSH Public Key: Select the SSH public key sources from the existing key stored in Azure, or generate the new key pair.
- Once you provide all required details, click Next: Virtual Machine Settings to display the Virtual Machine Settings tab. Provide the following details and click Next: Review + create:
- Virtual machine size: This is the size of the intended virtual machine. You must select a corresponding Virtual Machine size for your desired instance size. This field is likely to default to your preferred virtual machine size. You can change the size by clicking the Change Size link. For more information on instance size, refer here.
- Public IP Address for the VM: Provide the public IP for the virtual machine. The field should display your preferred IP address. If you want to access your virtual machine using a private IP address instead, select None in the drop-down menu.
- DNS Prefix for the public IP Address: Provide the DNS prefix for the public IP address. This address must be globally unique. If you selected None in the previous setting, and you wish to continue connecting via a private IP address, this field will be disabled.
- Virtual Network: Provide a name for the virtual network. If you don't have an existing virtual network, you can create a new one by clicking Create new. The Azure Virtual Network service enables Azure resources to securely communicate with each other in a virtual network, which is a logical isolation of the Azure cloud dedicated to your subscription. You can connect virtual networks to other virtual networks, or your on-premises network.
- Subnet: Provide subnets for the virtual network. The subnet's address is arranged in a CIDR notation. It must be contained by the address space of the virtual network. This field is likely to be pre-configured by default with your preferred subnet details.
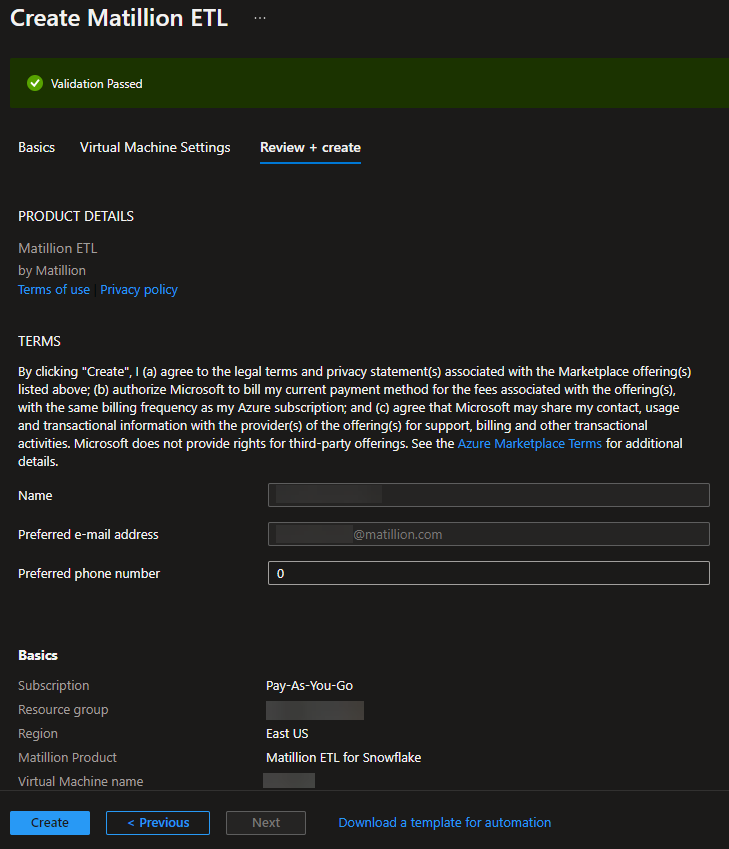
- At this point if all settings have been configured correctly, at the top of the Review + Create tab, you will see a Validation Passed message. Use this last page to review the details of the virtual machine you provided earlier. Then, click Create.
- In the Azure portal browse and find Virtual Machines. Select your new Virtual Machine and copy the Public IP Address. You can launch your Matillion ETL instance via its listed Public IP Address.
Note
If you want to access your virtual machine using a private IP address, you are required to access your virtual machine's private network via a Bastion Host, VPN connection or a Load Balancer.

- Enter the public IP address or the private IP address of your virtual machine into the browser to launch your Matillion ETL instance. On the Matillion ETL login page, provide valid login credentials, and click Log In.
Warning
The first time you log into your Matillion ETL instance, the client will use the following credentials:
- Username: azure-user
- Password: azure-user
- We STRONGLY advise that you immediately replace this default username and password with your own secure details, within the Matillion ETL client. This can be done through User Configuration in the Admin Menu.
- Once logged in, you will be required to enter your Azure details and, optionally, Instance Credentials.
Upon creation of your Matillion ETL instance, you will be required to associate it with your Matillion Hub user account. If your Matillion ETL instance is not already registered with the Matillion Hub, a pop-up dialog box will be displayed. Click Associate instance in the Hello there, we haven't seen thi instance before pop-up dialog to connect your new Matillion ETL instance with Matillion Hub.
After you have confirmed your association of your Matillion ETL instance, you will be directed to the Matillion Hub homepage. Click the Sign Up tab, and provide the email address you would like to associate with your >Matillion Hub account, then enter a new password. Tick the checkbox to agree to the terms and conditions of your new account, then click SIGN UP.
After you complete the registration process and Associate your instance with your Matillion Hub account, you are now able to launch your Matillion ETL instance. You will be given full access to its services and features.

Warning
If you are subscribed to the 14-day trial version of the product, please make sure you return to Matillion Hub to upgrade the license before your trial finishes. For more information about upgrading, read Manage Subscription.
Set up/Upgrade subscription
- To set up and manage your subscription, you need to go to the Matillion Hub and login with your existing user credentials. These credentials will have been created during the account registration process.
- The browser will redirect you to Choose an account, then take you to Select your service.
- Click View account usage, where you can manage your subscription. For more information, read Manage Subscription, and scroll down to Setting up a subscription.
For information about payment and invoice management for your subscription, please read Manage Payment Details and Invoices.
Note
- While you are on a trial version, you are allowed to add a maximum of 3 instances.
- The trial plan runs for 14 days and includes the same benefits as the Enterprise edition.
- For more information on adding a new instance in your Matillion Hub account, refer to the next section.
Add (Azure) Instances to Matillion Hub
- To add a new Matillion ETL instance to your existing Matillion Hub account, follow the instructions here.
- Select Microsoft Azure as your chosen Cloud Provider, and in step 7 of the guide attached in the previous step, Matillion Hub will pre-populate your Azure Resources Manage Template for you to review in Azure.
- To finalize this process, click the Continue in Azure button.

- The browser will redirect you to the Matillion ETL page in Azure. In order to create a new Matillion ETL instance and configuration, follow the steps mentioned earlier in Launching Matillion ETL from the Azure Marketplace.
Note
Alternatively, click Invite a team member if you don't have the required permissions. This nominated team member will be able to choose the configuration for you.
Removing the Virtual Machine
Several resources are included when you create an Azure virtual machine. To remove a virtual machine, you can also choose to delete the associated resources at the same time. Deleting these resources is important because it ensures no further costs are incurred. Each resource shares the same prefix as your virtual machine. The resource types to look for are:
- Disk
- Public IP Address
- Network security group
- Network interface
When you want to remove a virtual machine in the Azure portal, the Delete [virtual_machine_name] dialog will be displayed where you can select the associated resource you wish to delete with your intended virtual machine.